
You need a clear, practical assessment of a brownstone’s exterior condition to protect value, safety, and long-term performance. A professional brownstone facade inspection by an experienced facade assessment contractor pinpoints material-specific problems, structural concerns, and safety hazards. These building inspection services include a detailed facade safety inspection, structural evaluation, and exterior condition report, helping property owners plan timely repairs and avoid costly surprises.
They will evaluate stone, mortar, metalwork, and decorative elements using targeted techniques and tools, check compliance with local codes, and outline a repair timeline and cost estimate. With proper maintenance planning, knowing what to expect from types of materials, common issues, and qualified providers helps prioritize repairs, preserve historic character, and extend the building’s lifespan.
Types of Brownstone Facade Materials
Inspectors must recognize original stone, common repair materials, and modern substitutes to assess condition, compatibility, and longevity. Understanding porosity, compressive strength, and typical failure modes guides correct repairs and material selection.
Natural Brownstone Properties
Original brownstone is a Triassic-Jurassic sandstone, typically feldspathic and iron-stained, with variable grain size and porosity. It often shows 10–20% porosity, compressive strengths from about 5–30 MPa, and a characteristic brown-red hue from iron oxides.
Weathering patterns include surface scaling, sandstone delamination, and sandstone powdering driven by freeze-thaw, salt crystallization, and moisture ingress. Cementitious deposits, biological growth, and soot staining commonly mask underlying micro-cracks.
Matching physical properties matters for repairs: density, porosity, and mineralogy should align to avoid differential movement. Samples for petrographic analysis and salt testing inform replication and selection of compatible replacement stone.
Common Restoration Materials
Lime-based mortars feature prominently: hydraulic or non-hydraulic lime mortars provide vapor permeability and flexibility, reducing stress on brittle brownstone. Typical mixes use hydrated lime with graded sand; hydraulic additives increase early strength when needed.
Portland cement is sometimes present in older repairs but can cause brick/stone spalling and trapping moisture due to higher stiffness and lower vapor permeability. Conservators recommend avoiding hard cementitious patches against original brownstone.
Stone dutchmen and tuckpointing use like-for-like sandstone where possible. Stainless-steel anchors and lime-based grout repair internal delamination while breathable consolidants (ethyl silicate) may strengthen friable surfaces when applied by professionals.
Modern Alternatives
Cast stone and architectural precast concrete provide consistent color and shape for large replacement elements, with compressive strengths typically above 20–40 MPa. They offer dimensional stability but differ in porosity and thermal behavior from natural brownstone.
High-performance restoration mortars and polymer-modified lime mortars improve adhesion and water resistance while retaining vapor permeability. Products vary; specifications should list water vapor transmission (permeance), compressive strength, and thermal expansion coefficients.
Fiber-reinforced repair mortars and resin injections address localized cracking and structural voids. Professionals must verify long-term compatibility through mock-ups and accelerated aging data before approving modern materials for historic facades.
Key Inspection Criteria for Brownstone Exteriors
Inspectors focus on surface condition, structural integrity, and moisture pathways that commonly cause deterioration. They document material loss, cracking patterns, misaligned elements, and staining to prioritize repairs and safety actions.
Surface Deterioration Indicators
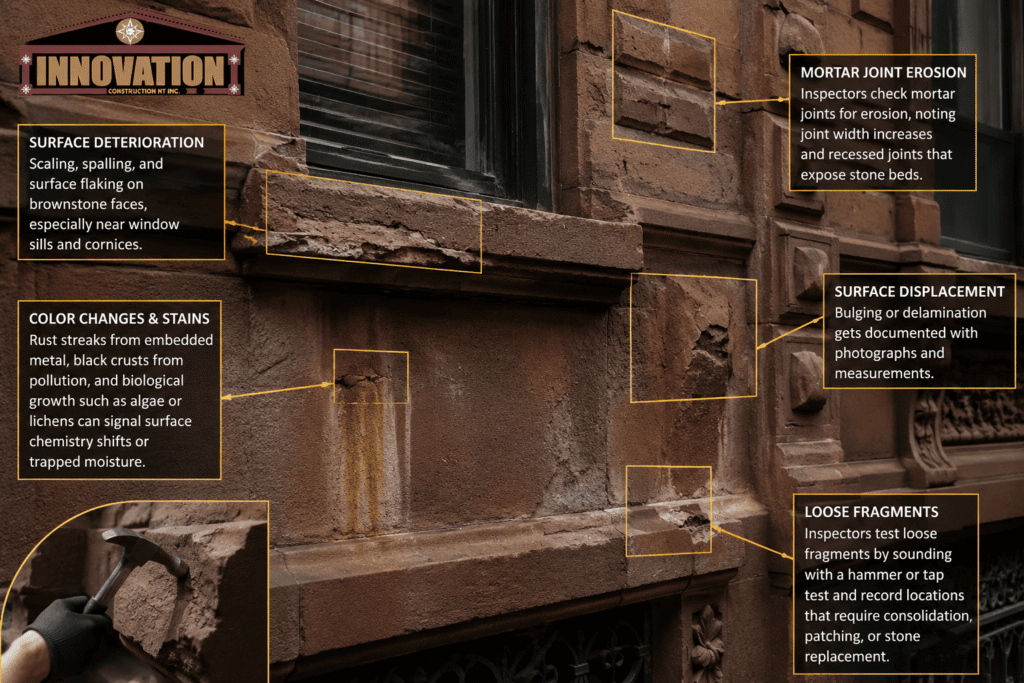
Inspectors look for scaling, spalling, and surface flaking on brownstone faces, especially near window sills and cornices where freeze-thaw cycles concentrate damage. They note depth of loss in millimeters, areas where original tooling is erased, and any powdery residue that indicates gypsum or sulfate attack.
Color changes and staining receive specific attention. Rust streaks from embedded metal, black crusts from pollution, and biological growth such as algae or lichens can signal surface chemistry shifts or trapped moisture. Inspectors check mortar joints for erosion, noting joint width increases and recessed joints that expose stone beds.
Surface displacement, such as bulging or delamination, gets documented with photographs and measurements. They test loose fragments by sounding with a hammer or tap test and record locations that require consolidation, patching, or stone replacement.
Structural Weaknesses
Inspectors assess lintels, brownstone sills, and cornices for bending, cracking, or separation from the masonry. They measure crack widths, map crack patterns (vertical, horizontal, stepped), and evaluate whether cracks traverse units or stop at mortar, which helps differentiate settlement from material failure.
Foundations and basement walls beneath the brownstone facade receive attention for settlement indicators like stepped cracks or differential mortar displacement. Tie rods, anchors, and embedded steel are inspected for corrosion; lost anchors often lead to facade instability and localized collapse risk.
Inspectors also evaluate load-bearing brownstone elements such as stoops and bay supports. They note deflection, spall over reinforcement, and any temporary shoring required. Recommendations include monitoring intervals, load redistribution, or engineered repair when cracks exceed action thresholds structural evaluation.
Moisture Intrusion Signs
Inspectors trace water staining paths from roofing, flashing, and window perimeters down the facade. They identify failed flashings, open counterflashings, and deteriorated sealant joints that allow rainwater to run behind the stone, then document staining, efflorescence, and softened mortar beds.
Interior indicators get correlated: damp spots on plaster, peeling paint near top floors, and elevated moisture meter readings behind the facade. Inspectors use infrared thermography and moisture probes to locate hidden wetting. They report high-risk conditions like trapped moisture at parapet-to-wall junctions or blocked weep paths.
Biological growth and salt deposits signal chronic moisture. Inspectors recommend targeted repairs: flashing replacement, re-pointing with compatible lime mortar, installation of ventilation paths, and localized stone removal where sustained wetting has compromised material.
Safety and Compliance Considerations
Inspectors must confirm legal obligations, document observed hazards, and recommend corrective scopes that meet municipal and insurance requirements. They should prioritize fall protection, façade stability, material hazards, and compliance records.
New York City Local Law 11 Overview
Local Law 11 (Facade Inspection & Safety Program, FISP) requires exterior wall inspections for buildings six stories or higher in NYC, performed by a licensed architect or engineer every five years. For brownstones under six stories, many still fall under FISP when altered or attached to taller structures, so inspectors verify building height, attached elevations, and prior filing cycles.
Reports (Class 1–4) categorize conditions and dictate remedial timelines; unsafe conditions (Class 1 or 2) require immediate protection measures and prompt filing of repair plans with DOB. Inspectors must use scaffold or swing-stage access when probing mortar joints or cornices, and document with annotated photos, measured sketches, and signed statements to satisfy DOB filing standards.
Safety measures include hard-hat zones, barricades, and fall-arrest systems when working at height. Firms should retain all inspection records for the DOB-required retention period and assist owners with DOB filings and permit coordination when repairs cross into regulated scopes.
Historic Preservation Codes
Historic District and Landmark protections affect allowable repair materials and methods for brownstones within designated zones. Inspectors must reference LPC (Landmarks Preservation Commission) permits and prior approvals before recommending replacement of masonry units, brownstone lintels, or historic storefront elements.
When original fabric is repairable, preservation standards favor patching, dutchman repairs, and matching mortar composition over full replacement. If replacement is necessary, specifications should call for compatible stone types, tooling, and mortar mixes documented with lab analysis of existing materials.
Inspectors often prepare preservation-sensitive scopes and provide drawings and sample panels to streamline LPC reviews. They should also flag lead paint, original lime-based mortars, or concealed historic finishes that trigger additional abatement or conservation protocols.
Insurance Implications
Insurers evaluate inspection findings for underwriting, premium adjustments, and required mitigations. Identified structural deficiencies, loose ornamentation, or deferred maintenance can lead to higher premiums, denial of façade coverage, or mandates for immediate protective measures.
Detailed, dated inspection reports with photographic evidence and prioritized repair timelines reduce insurer uncertainty and support claims defenses. For significant hazards, carriers may require interim controls (netting, scaffolding, sidewalk sheds) and proof of completed repairs before reinstating full coverage.
Inspectors should advise owners to notify their insurance broker promptly and provide a scope-of-work and contractor estimates. Keeping repair invoices and DOB filings eases future claims and demonstrates risk reduction to underwriters.
Inspection Techniques and Tools
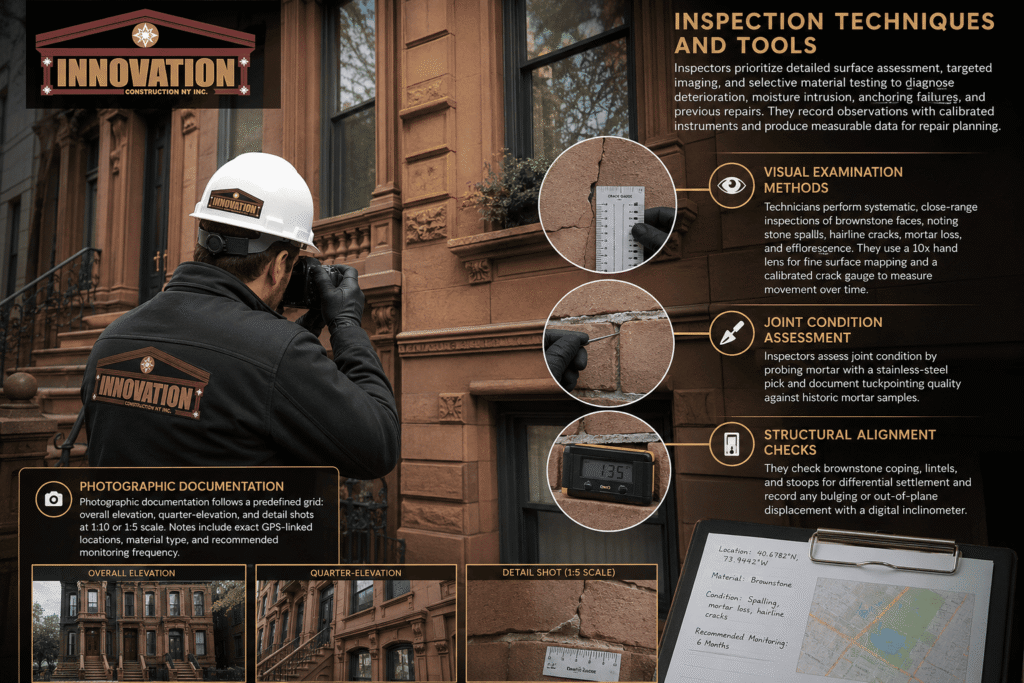
Inspectors prioritize detailed surface assessment, targeted imaging, and selective material testing to diagnose deterioration, moisture intrusion, anchoring failures, and previous repairs. They record observations with calibrated instruments and produce measurable data for repair planning.
Visual Examination Methods
Technicians perform systematic, close-range inspections of brownstone faces, noting stone spalls, hairline cracks, mortar loss, and efflorescence. They use a 10x hand lens for fine surface mapping and a calibrated crack gauge to measure movement over time.
Inspectors assess joint condition by probing mortar with a stainless-steel pick and document tuckpointing quality against historic mortar samples. They check brownstone coping, lintels, and stoops for differential settlement and record any bulging or out-of-plane displacement with a digital inclinometer.
Photographic documentation follows a predefined grid: overall elevation, quarter-elevation, and detail shots at 1:10 or 1:5 scale. Notes include exact GPS-linked locations, material type, and recommended monitoring frequency.
Aerial and Drone Assessments
Licensed drone pilots capture high-resolution oblique and orthographic images of upper facades, cornices, chimneys, and parapets that are difficult or unsafe to inspect from the ground. They fly at 10–30 m altitude with overlapping imagery suitable for photogrammetric processing.
Drones carry 20–50 MP cameras and thermal sensors when needed; operators use RTK GPS for centimeter-level positional accuracy. Operators avoid flights during high wind or near power lines and comply with local Part 107 regulations and building-specific access restrictions.
Teams generate 3D models and elevation maps from drone data to measure deformation, locate delamination, and plan targeted scaffolding or mast climber access. Deliverables include georeferenced orthomosaics, annotated inspection stills, and short video clips of observed defects.
Non-Destructive Testing
NDT methods validate subsurface conditions without removing material. Common tools include infrared thermography to detect moisture and delamination, ground-penetrating radar (GPR) for locating voids and embedded metal anchors, and ultrasonic pulse velocity to assess stone integrity.
Technicians calibrate GPR and ultrasonic units against known material samples and record signal strength, depth penetrations, and anomaly signatures. Portable rebound hammers provide comparative surface hardness data but are not used as sole indicators of structural capacity.
When moisture is suspected, calibrated pin and non-contact moisture meters quantify percent moisture content at specific depths. All NDT findings get correlated with visual observations and lab-tested mortar or stone cores when physical confirmation is required.
Common Brownstone Facade Issues
Brownstone facades often show predictable signs of distress that affect appearance, structure, and water management. Damage typically centers on stone surface breakdown, salt-driven deposits, and failures at mortar and flashings.
Cracking and Spalling
Cracking usually begins as hairline fissures in sandstone or brownstone veneer and can progress into wider fractures when left unaddressed. Freeze-thaw cycles force water into tiny cracks; when that water freezes, it expands and pries the stone apart, producing spalls—flaking or chunks that detach from the surface.
Structural movement from settling or vibration also produces through-cracks that reach the bond between stone and backup wall. Those cracks let more water and salts into the assembly, accelerating deterioration and risking loose units that require anchoring or replacement. Inspectors look for crack patterns (vertical, stair-step, or map-cracking) to distinguish thermal, settlement, or bond failures.
Repair options depend on depth and location: surface consolidation and patching for minor spalls, stainless-steel anchors and dutchmen (stone inserts) for detached pieces, and selective replacement when integrity is lost. Match replacement stone by color, grain, and tooling to preserve appearance and avoid future mismatch stresses.
Efflorescence Formation
Effloresce is the white, chalky deposits on the surface of stone or mortar which indicate that every moisture movement is bringing soluble salts to the lintel face. It is not just aesthetic problems, high groundwater, poor drainage, leaking pipes or even salts in mortars and cleaning agents often cause it too.
Low pressure washing with an appropriate chemical cleaner removes deposits but the source of moisture must be addressed and remedied to prevent future recurrence. Typical solutions include improving site drainage, the replacement of leaking flashings and using low-soluble-salt formulations to replace high-salt mortars.
When deposits come back, document salt patterns and supplement with a soluble-salt test. If the pH of the efflorescence evaporates, this process can last for more than a hundred years and it can make some rock very weak from the inside as if salt crystallizes where there are no pores little by little it breaks away into granules.
Joint Failures
Joint failures occur when mortar joints crack, erode, or lose adhesion, compromising the weathertight seal between stones. Exposed or missing mortar allows direct water intrusion behind the facade and permits freeze-thaw damage to expand behind the veneer.
Common causes include use of hard Portland cement mortars on softer brownstone, thermal movement, and vibration from traffic or construction. Proper repointing requires removing deteriorated mortar to a suitable depth, matching mortar compressive strength and porosity, and tooling joints to shed water.
Inspectors evaluate joint profiles, bond line adhesion, and backfill condition. Repointing, installing flexible flashing, and replacing failed through-wall flashings restore drainage paths and prevent recurring joint deterioration.
Process and Timeline of Exterior Evaluations
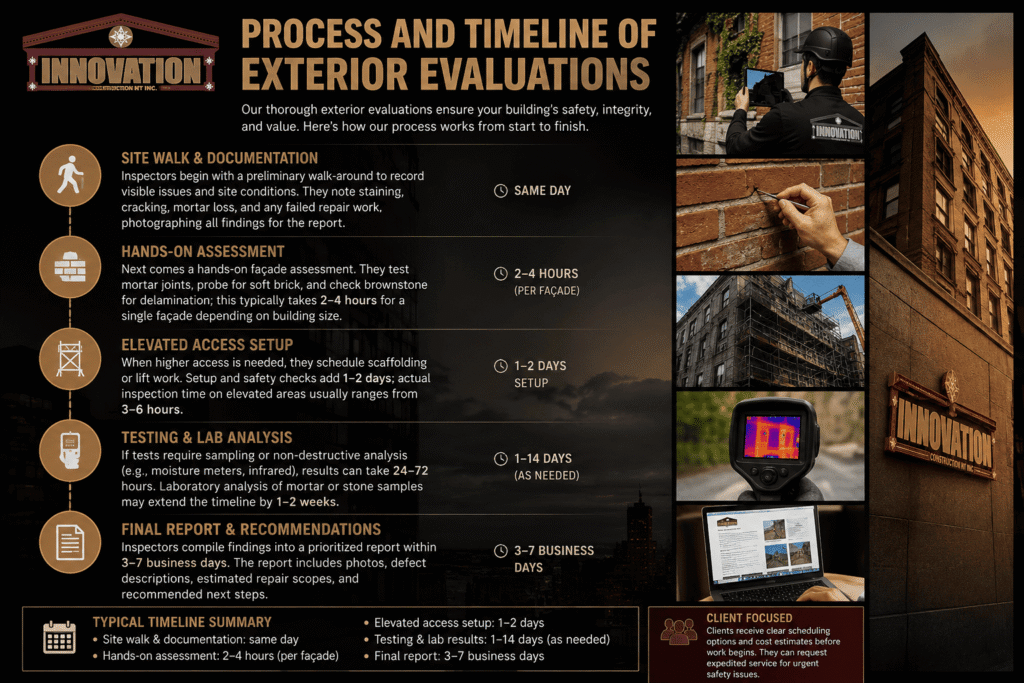
Inspectors begin with a preliminary walk-around to record visible issues and site conditions. They note staining, cracking, mortar loss, and any failed repair work, photographing all findings for the report.
Next comes a hands-on façade assessment. They test mortar joints, probe for soft brick, and check brownstone for delamination; this typically takes 2–4 hours for a single façade depending on building size.
When higher access is needed, they schedule scaffolding or lift work. Setup and safety checks add 1–2 days; actual inspection time on elevated areas usually ranges from 3–6 hours.
If tests require sampling or non-destructive analysis (e.g., moisture meters, infrared), results can take 24–72 hours. Laboratory analysis of mortar or stone samples may extend the timeline by 1–2 weeks.
Inspectors compile findings into a prioritized report within 3–7 business days. The report includes photos, defect descriptions, estimated repair scopes, and recommended next steps.
Typical timeline summary:
- Site walk & documentation: same day
- Hands-on assessment: 2–4 hours (per façade)
- Elevated access setup: 1–2 days
- Testing & lab results: 1–14 days (as needed)
- Final report: 3–7 business days
Clients receive clear scheduling options and cost estimates before work begins. They can request expedited service for urgent safety issues.
Choosing a Qualified Inspection Provider
Pick an inspector who holds the right licenses, demonstrates relevant brownstone experience, and provides clear, itemized deliverables. Verify credentials, review recent client work, and read sample reports to confirm inspection depth and actionable recommendations.
Essential Credentials to Look For
Inspectors should hold a current state home inspector license where required and an ICC or ASHI certification for masonry or historic building inspections. Those credentials show formal training and adherence to industry standards.
Confirm liability coverage and professional indemnity insurance. Larger brownstone projects can expose inspectors to claims; insurance protects both parties and signals a professional practice.
Look for specialized training in stone masonry, pointing, and historic-preservation standards (e.g., National Park Service or SHPO workshops). Certifications in thermal imaging, moisture meters, and drone operation are beneficial for façade access and noninvasive diagnostics.
Verify continuing-education records and recent job logs. That helps ensure the inspector applies up-to-date techniques for assessing concealed deterioration such as hidden steel lintel corrosion or failed backing materials.
Client References Evaluation
Request at least three recent references from brownstone projects completed within the last 12–24 months. Prefer references from buildings similar in age, construction, and height to the reader’s property.
Ask references specific questions: Did the inspector identify structural or moisture issues others missed? Were recommendations prioritized and cost-estimated? How clear was the communication during and after the inspection?
Check online reviews and public court records for disputes or workmanship claims. A pattern of complaints About missed defects or poor reporting indicates a red flag.
If possible, visit one referenced site to view the inspector’s work firsthand. Seeing annotated photos, repair follow-up, and how recommendations were implemented gives practical insight into their effectiveness.
Sample Reports and Recommendations
Request a full sample report from a recent brownstone façade inspection, not a redacted summary. A complete report should include: scope of work, inspection methods, annotated high-resolution photos, elevation sketches, and a prioritized defect table.
Look for specific diagnostic data: moisture readings, thermal imagery, mortar and stone descriptions, and sample lab results when applicable. Generic statements without measurements suggest a superficial review.
Evaluate the recommendations for clarity and actionability. Good reports provide phased repair plans (urgent, near-term, monitor), estimated cost ranges, and suggested contractor qualifications.
Check for traceability: each finding should reference supporting evidence (photo ID, location, measurement). Reports that link recommendations to code or preservation standards demonstrate technical rigor.
Cost Factors Affecting Inspection Services
Costs vary with building access complexity, level of facade ornamentation, and whether multiple visits are required. Inspectors price work by labor hours, equipment needs, permit costs, and report detail.
Building Height and Location
Height directly affects labor and equipment. Ground-level checks for a two-story brownstone typically use ladders and 1–2 inspectors; five- to six-story buildings require swing-stage scaffolding or suspended platforms, certified riggers, and 2–4 technicians, which raises hourly rates and mobilization fees.
Location drives travel time, permit needs, and restricted-access charges. Dense urban settings often require street-closure permits, municipal inspection fees, and traffic-control attendants. Remote or high-security neighborhoods add travel surcharges and longer mobilization windows.
Weather and time-of-day constraints also change cost. Winter inspections need cold-weather safety gear; night or weekend access may incur overtime rates. Inspectors include contingency time for hoist setup, utility coordination, and safety briefings.

Extent of Detailing Required
A visual-only survey costs less than a hands-on or invasive inspection. Visual surveys document cracks, mortar loss, and staining with photos and notes; they take 2–6 hours for a typical brownstone facade. Hands-on: mortar probe, loose-unit removal, and a closer masonry assessment add skilled labor and tools, extending time to 6–12 hours or more.
Material testing, like petrographic analysis or chloride/metal testing, adds lab fees ($200–$1,200 per test) and waiting periods. Detailed elevation mapping, moisture mapping with infrared, and measured-drawings require specialized instruments and CAD drafting time, increasing report complexity and price.
The required deliverables determine final cost. A basic PDF report with annotated photos is less expensive than a stamped engineering repair plan, which mandates an architect/engineer review and larger liability limits.
Follow-Up Inspection Needs
Follow-up inspections create recurring costs tied to frequency and scope. Warranty or post-repair inspections often occur at 30, 90, and 365 days; each visit includes re-mobilization and a focused checklist, typically billed at reduced rates or as a contract add-on.
If repairs fail or additional deterioration appears, inspectors perform condition re-evaluations and may recommend destructive testing, which resets cost estimates. Monitoring programs using crack gauges or embedded sensors incur initial installation fees plus periodic data collection and interpretation charges.
Contract structure affects pricing for follow-ups. Time-and-materials contracts bill each revisit separately. Fixed-fee service agreements can bundle multiple follow-ups at a discounted rate but require clear scope definitions to avoid change-order costs.
Long-Term Maintenance Strategies
Regular monitoring, planned interventions, and expert collaboration reduce deterioration and unexpected costs. The strategies below prescribe timing, documentation, and roles for maintaining brownstone facades over decades.
Scheduled Facade Assessments
They schedule visual inspections every 6–12 months and full technical surveys every 3–5 years, depending on exposure and previous issues. Visual checks target mortar joints, brownstone spalls, efflorescence, paint failure, and flashing; technicians document findings with date-stamped photos and annotated drawings.
Technicians use high-resolution photography, drone imaging for parapets and stoops, and ultrasonic or infrared scanning where hidden voids or moisture are suspected. Reports include priority codes (urgent, near-term, routine), estimated repair scopes, and cost ranges to aid budgeting.
Maintenance managers keep an electronic log of all inspections, linked to invoices, permits, and contractor contacts. This log triggers reminders and helps track recurring problems like freeze-thaw damage or rising damp.
Preventative Repair Planning
They develop a rolling 10-year repair plan tied to inspection data and life-cycle expectations for materials. The plan lists tasks by season, estimated costs, and recommended contractors for masonry tuckpointing, stone patching, lintel replacement, and protective coatings.
Prioritize interventions that stop water intrusion: replace failed flashing, re-point deteriorated mortar with compatible lime-based mixes, and install through-stone weep systems where needed. Small patch repairs and proper mortar selection prevent larger spalls and reduce the need for full stone replacement.
Budgeting uses staged projects to smooth capital outlay: year 1 urgent repairs, years 2–4 medium repairs, years 5–10 major restorative work. Each item includes performance criteria and inspection milestones to confirm workmanship before final payment.
Collaboration With Restoration Experts
They retain conservators and licensed masons experienced with 19th-century brownstone and historic-preservation standards. Contracts specify qualifications, sample mock-ups for approvals, insurance, and warranties on workmanship and materials.
Restoration teams advise on material compatibility—limestone-like brownstone requires soft lime mortar, not hard Portland—and they perform test patches to validate color, texture, and bond. Conservators recommend reversible treatments and document interventions for future stewards.
Project managers facilitate weekly site meetings, change-order controls, and preservation-compliant permit submissions. They also coordinate scaffolding access, dust control, and neighbor notifications to minimize disruption and ensure code compliance.