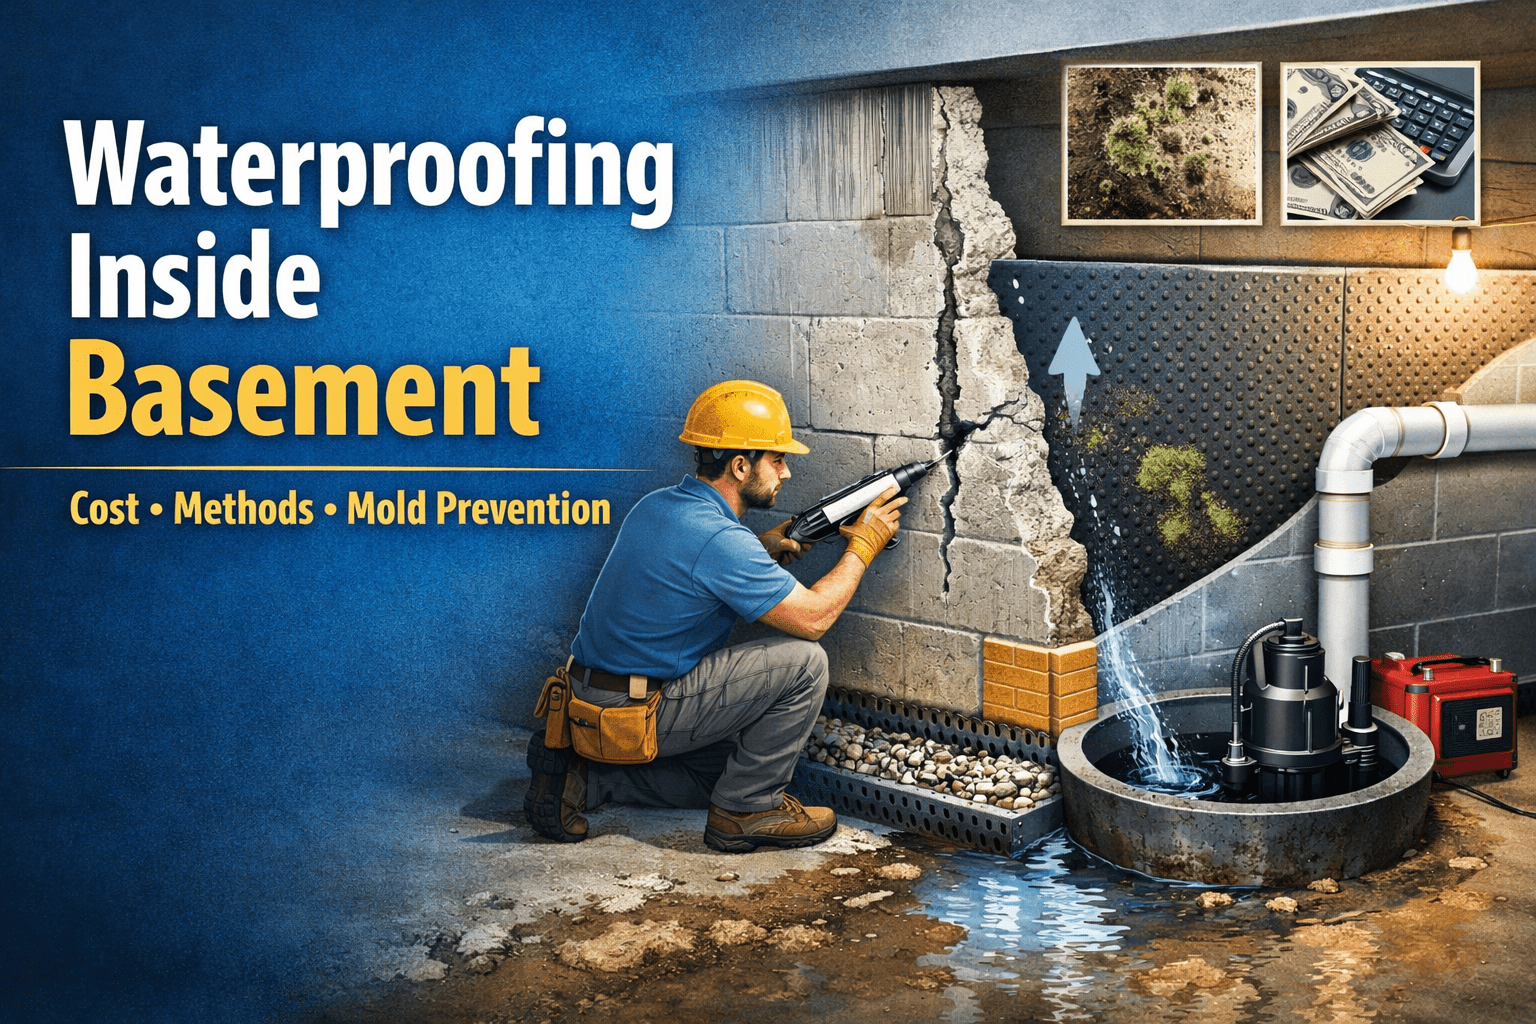
Keeping water out of a basement is more than just a comfort issue; it is about protecting the structure of your home, preserving stored belongings and avoiding harmful mold. In a city like New York, where many homes have aging basements and high water tables, waterproofing inside basement spaces is vital. This comprehensive guide explains why basements leak, compares interior and exterior approaches and walks you through inside waterproofing basement strategies. It also breaks down the cost of waterproofing basement from inside and offers tips for moisture control and mold prevention.
Why Basements Get Wet: Causes and Warning Signs
Water intrusion happens for a variety of reasons. Hydrostatic pressure (water pressure in saturated soil) pushes against foundation walls and floors. Cracks in concrete, improper grading around the house, clogged gutters and damaged downspouts all allow water to pool near the foundation. Other causes include inadequate footings that shift with soil erosion, clogged or damaged weeping tiles (perimeter drains) and water accumulation in window wells.
Homeowners should look for a combination of tell‑tale signs that point to basement moisture problems:
- Cracks and buckling walls. Horizontal, vertical or stair‑stepped cracks and inward‑bowing walls often indicate hydrostatic pressure.
- Peeling paint and efflorescence. Water seeping through walls may cause bubbling paint and leave a white, powdery residue on basement walls.
- Musty odors and mold. Mold thrives in damp, dark areas and can cause respiratory problems. Persistent dampness is a breeding ground for mold spores; controlling moisture is therefore critical for mold prevention in basement spaces.
- Standing water or damp floors. Pools of water near walls or puddles after heavy rain are clear signs of leaks.
- Rust on appliances or rot in wood framing. Metal rust and wood rot indicate prolonged exposure to moisture.
Understanding the causes and early warning signs helps you choose the right basement leak repair solutions and avoid severe structural damage.
Interior vs. Exterior Waterproofing
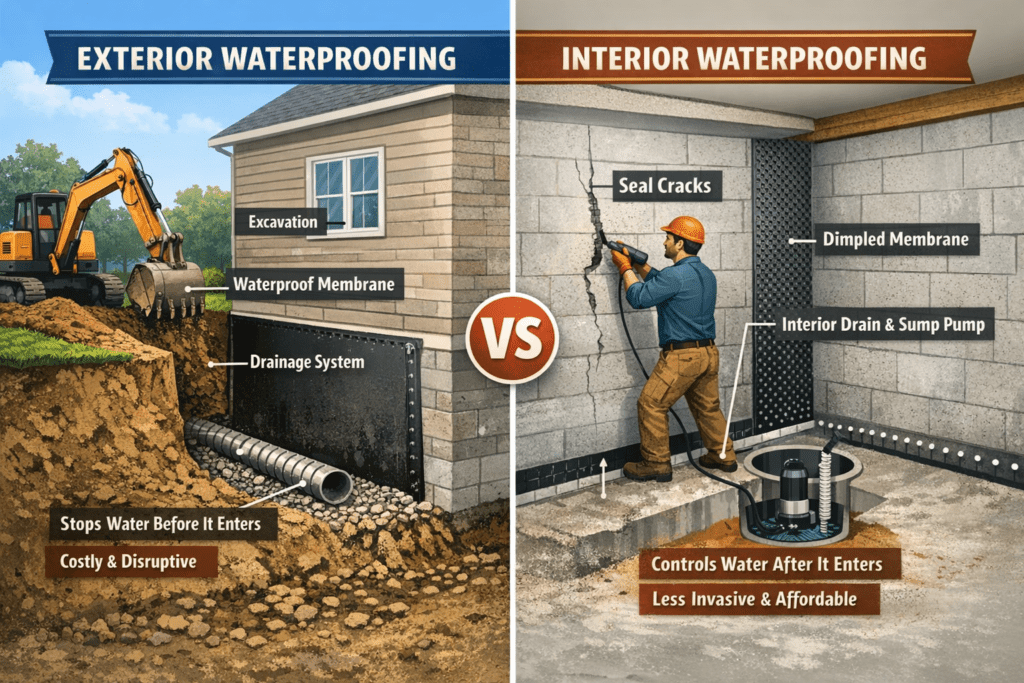
Before diving into the techniques, it helps to understand the difference between interior and exterior waterproofing. Exterior waterproofing aims to stop water before it ever reaches your basement. It often involves excavation around the foundation, applying membranes, installing new drainage tile and backfilling. The International Building Code (IBC) recognizes exterior waterproofing as the only method that fully prevents structural damage.
Interior basement waterproofing, on the other hand, does not attempt to stop water outside; instead it manages water once it enters. Interior methods are less invasive and typically more affordable. Many interior drainage systems are patented and recognized by Building Officials and Code Administrators (BOCA) as effective for controlling basement water. They are ideal for homes where exterior excavation is impractical, such as row houses in Manhattan or properties with limited yard access. However, interior waterproofing focuses on water management rather than true waterproofing; it usually pairs sealing with drainage to collect and pump out water.
Pros and cons
| Approach | Typical use and benefits | Limitations |
|---|---|---|
| Exterior waterproofing | Prevents water from contacting the basement walls; long‑term protection; required by code for new construction | Expensive and disruptive; requires excavation; may require permits and landscape restoration |
| Interior waterproofing | Manages water that enters; less invasive and more affordable; accessible for finished basements and urban homes | Does not stop moisture from reaching the foundation; relies on pumps and drainage; may need maintenance |
For many homeowners, a combination of exterior grading improvements and interior water management offers the best balance of cost and effectiveness.
Effective Interior Basement Waterproofing Methods
Sealing Cracks and Penetrations
The first step in inside basement waterproofing is addressing the entry points for water. In poured concrete foundations, cracks and pipe penetrations are common entry points. Contractors inject strong adhesives such as epoxies or urethanes into the cracks, filling them through to the exterior and stopping the seepage path. Interior sealants help manage minor leaks and condensation, and they prevent humid air inside your basement from absorbing into porous masonry and causing spalling (surface deterioration). These sealants form part of basement sealing methods but are not a permanent solution where hydrostatic pressure is significant.
Interior Drainage and French Drains
An interior drainage system is the heart of waterproofing basement walls from inside. Although it is technically water management, it is widely referred to as a basement waterproofing solution. The process involves cutting a channel along the perimeter of the basement floor near the footings, installing a perforated pipe or interior French drain and covering it with gravel and concrete. When groundwater seeps through the wall, it drains into this channel and flows to a sump pump. Wall conduits (dimple boards) are fastened to the foundation and direct moisture down into the drainage system.
Basement drainage system installation may also include installing clean‑outs for maintenance. For finished basements, contractors often hide the drainage under the floor and behind baseboards to preserve the interior appearance.
Sump Pumps and Backup Systems
A sump pump collects water from the interior drainage system and pumps it outside. It sits in a sump basin at the lowest point of the basement. A typical system includes a submersible pump, check valve, discharge pipe and sometimes a battery backup or water‑powered backup. The Federal Emergency Management Agency (FEMA) recommends using a water alarm and a battery‑operated backup pump to avoid flooding during power outages. Regular testing and maintenance ensure that your sump pump is ready when a storm hits.
Interior Foundation Waterproofing Membranes
In addition to drainage, many professionals install a waterproof membrane against the interior walls. Dimpled membranes create an air gap that guides water down to the French drain. Polymer‑based waterproofing products, developed over the past decade, can be sprayed onto walls; they are fast‑curing, last for the building’s life and are unaffected by soil pH. These membranes form the backbone of interior foundation waterproofing and are often used in conjunction with sealants.
Mold Prevention and Moisture Control
Keeping your basement dry is not just about stopping liquid water. Controlling humidity is key to mold prevention in basement spaces. Use a dehumidifier to maintain relative humidity below 50 %, insulate cold pipes to prevent condensation and install vent fans or mechanical ventilation. Address plumbing leaks promptly and avoid drying laundry in the basement. Interior sealants help stop humid air from penetrating masonry, but full mold prevention requires continuous moisture management. Because mold can cause respiratory issues, regular inspections are important.
Basement Sealing Methods
Homeowners sometimes apply waterproof paint, cementitious coatings or crystalline sealers to basement walls as do‑it‑yourself solutions. These products can reduce minor dampness and condensation, and they are relatively inexpensive. However, coatings will not stop significant leaks or structural cracks. For true waterproof basement walls from inside, sealing must be combined with drainage, crack repair and, where necessary, exterior water management.
Step‑by‑Step Guide to Waterproofing Basement Walls from Inside
- Inspect and diagnose. Identify sources of moisture. Check gutters, downspouts and grading outside. Inside, look for cracks, damp spots and signs of water damage.
- Fix exterior drainage issues. Even when waterproofing inside basement spaces, improving exterior drainage reduces hydrostatic pressure. Clean gutters and downspouts, extend them away from the foundation and re‑grade soil to slope away from the house. Install window well covers and unclog weeping tiles.
- Seal cracks and penetrations. Use epoxy or polyurethane injection to seal cracks in poured concrete walls. For masonry walls, use cementitious patching and surface sealers.
- Install interior drainage. Cut a trench around the perimeter of the basement floor, place a perforated pipe or interior French drain and cover with gravel and concrete.
- Install a sump pump. Place a sump basin at the lowest point; connect the drainage pipe to the basin and install a pump with a check valve and discharge line. Add a battery backup and alarm.
- Apply membranes and wall conduits. Fasten dimpled membrane or waterproof panels to the foundation walls to direct moisture into the drainage system. This step completes the interior waterproofing system.
- Finish surfaces and restore. After the drainage and membrane are in place, restore the floor and walls. Use moisture‑resistant drywall and insulation for finished basements.
- Monitor and maintain. Test the sump pump regularly, keep gutters clean and inspect the basement every season for new cracks or dampness. Consider adding a dehumidifier for basement moisture control.
While some steps can be done by experienced DIYers, projects involving trenching, pumps or structural cracks are best handled by professionals. Innovation Construction NY offers licensed interior waterproofing services, including basement drainage system installation and mold remediation.
Cost of Waterproofing Basement From Inside
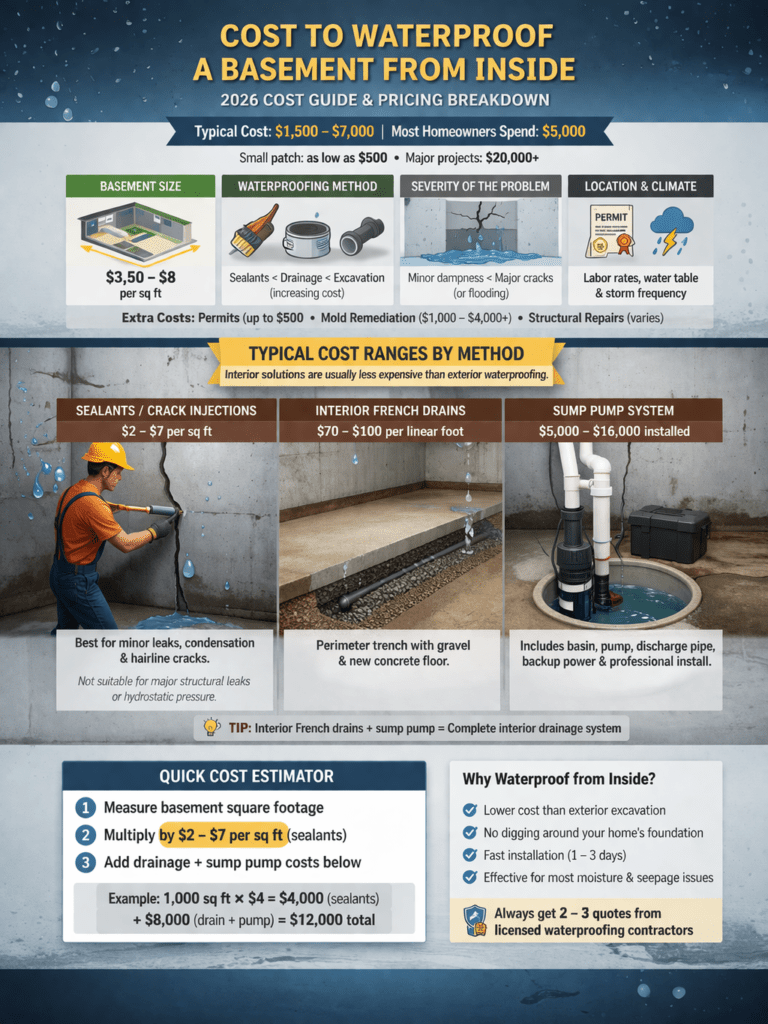
Budgeting for waterproofing basement from inside is essential. According to a 2026 cost analysis by Modernize, waterproofing a basement costs between $1,500 and $7,000, with most homeowners spending around $5,000. A small patch with surface sealant might be as low as $500, whereas large projects involving excavation or multiple drainage systems can exceed $20,000. Interior solutions are generally less expensive than exterior methods.
Cost factors
Several variables influence the waterproofing basement walls from inside cost:
- Basement size. Contractors typically charge $3.50 to $8 per square foot.
- Method of waterproofing. Simple sealants cost far less than installing drainage or excavation systems.
- Severity of the problem. Repairing a damp corner costs less than addressing major structural cracks or flooding.
- Location and climate. Labor rates and water tables vary by region; storm‑prone areas often require more robust systems.
- Additional expenses. Permits may cost up to $500, mold remediation can exceed $4,000, and structural repairs can surpass the waterproofing costs.
Typical cost ranges by method
| Interior solution | Typical cost range | Notes |
|---|---|---|
| Sealants / crack injections | $2 – $7 per square foot | Ideal for minor leaks, condensation and hairline cracks; not effective for major hydrostatic pressure |
| Interior French drains | $70 – $100 per linear foot | Installed inside the perimeter trench; includes gravel and new concrete |
| Sump pump system | $5,000 – $16,000 installed | Includes basin, pump, discharge pipe, backup power and professional installation |
To estimate the waterproofing basement walls from inside cost for your home, multiply the square footage of the basement by the per‑square‑foot price for sealants, then add linear footage costs for drainage and the pump system. Always get multiple quotes from licensed contractors; professionals provide warranties and can identify hidden issues.
Maintenance, Moisture Control and Prevention
After investing in inside waterproofing basement systems, ongoing maintenance protects that investment. Here are practical tips for basement moisture control and preventing future problems:
- Maintain gutters and downspouts. Clean them at least twice per year and ensure downspouts extend several feet away from the foundation.
- Grade the soil correctly. The ground should slope away from your house. Add soil or hardscaping as needed to direct water away.
- Install window well covers and inspect footings. Prevent water accumulation in window wells and check that weeping tiles (drainage pipes) are not clogged.
- Test the sump pump. Pour water into the sump pit periodically to ensure the pump activates. Replace backup batteries every 2–3 years.
- Use a dehumidifier. Maintain indoor relative humidity below 50 % to discourage mold and condensation.
- Inspect for cracks and mold. Conduct seasonal inspections of walls, floors and framing. Address small cracks immediately using sealant to avoid bigger problems.
Regular maintenance and moisture control not only prolong the life of your waterproofing system but also contribute to a healthier living environment.
Final Thoughts
Inside basement waterproofing is an effective, budget‑friendly way to address common water problems without excavating your yard. By sealing cracks, installing an interior drainage system and maintaining proper humidity, you can keep your basement dry, protect your belongings and avoid structural damage. The cost of waterproofing basement from inside varies widely depending on the size of your basement and the methods used, but interior solutions are usually more affordable than exterior excavation.
If you live in the New York area and need professional help with waterproofing basement walls from inside, contact Innovation Construction NY. Our team specializes in inside waterproofing basement systems, basement leak repair solutions and basement moisture control. We’ll assess your unique situation, provide transparent pricing and implement a reliable waterproofing system to keep your home safe and dry.