
Cracked Brownstone Facade — What It Means and How to Fix It Properly
Cracked Brownstone Facade — What It Means and How to Fix It Properly
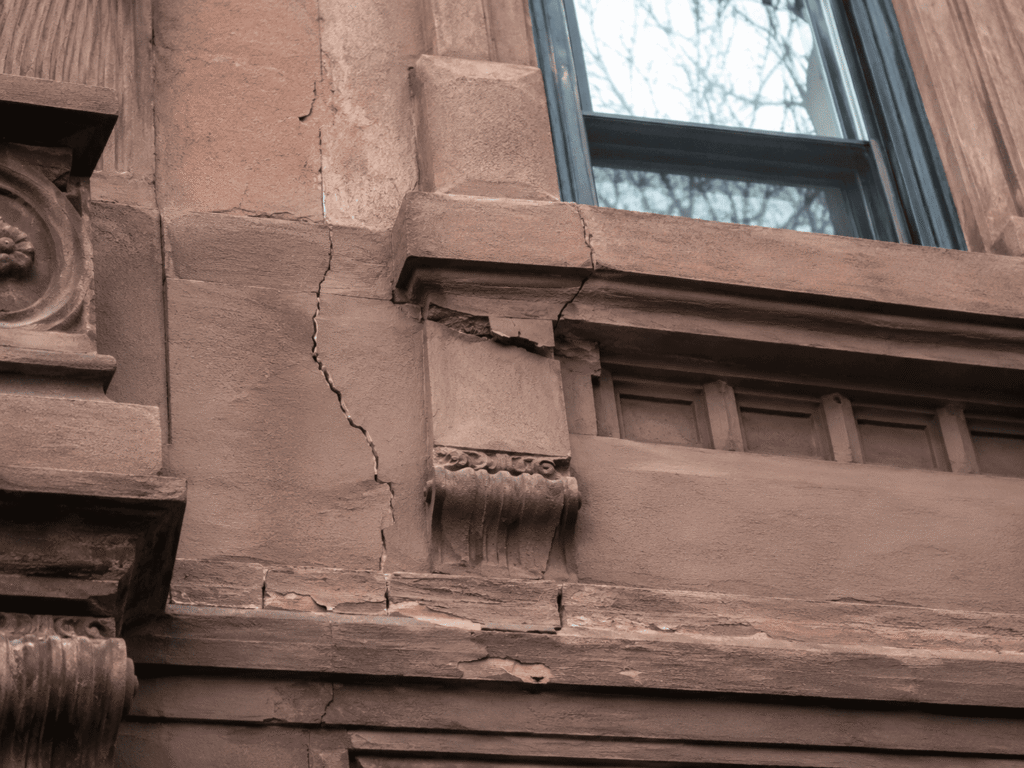
Cracks in a brownstone facade range from cosmetic surface issues to symptoms of serious structural problems. The pattern of the crack — vertical, horizontal, stair-step, hairline, wide — tells you what’s actually happening behind it. This page helps you read the cracks on your own facade, understand whether they’re urgent, and know what proper repair looks like.
Cracks getting worse? Send us a few photos or have us come look — we’ll tell you what’s going on.
📞 718-666-7679 | 212-666-5441
What Brownstone Actually Is — And Why It Cracks
Brownstone is sandstone — specifically, the reddish-brown Triassic-Jurassic sandstone quarried in Portland, Connecticut, the Hackensack Valley in New Jersey, and a few other regional sources. It’s a sedimentary stone, made of compressed sand grains held together by natural cement (typically iron oxide, which is what gives the brown color).
This composition is beautiful and was easy to carve, which is why every elaborate window surround and ornamental cornice in 1880s Brooklyn is brownstone. But it’s also a relatively soft, water-absorbent stone with a layered bedding structure. When water gets into the layers, freezes, and expands, the layers separate and the stone delaminates — which is why most brownstone cracks are along the original bedding planes, not random.
Reading the Cracks
Hairline Cracks Following Bedding Planes
Thin cracks running roughly horizontally across the face of the stone, often visible only when wet. These are the early stages of delamination — water is starting to separate the sandstone layers. Not urgent yet, but they’ll progress. Catch them now with consolidation treatment and you save a much larger repair later.
Stair-Step Cracks Above Windows
Cracks that follow the mortar joints upward in a staircase pattern, usually above a window or door opening. This is almost always lintel failure — the steel lintel behind the brownstone has rusted and expanded, pushing the masonry above it apart. The fix is replacing the lintel, not patching the cracks. Patches will keep reopening every winter until the lintel is addressed.
Vertical Cracks Through Stone
A vertical crack that runs straight through a piece of brownstone (not following bedding planes) usually indicates structural movement — settlement, foundation issues, or load redistribution. These are more serious and may need a structural engineer’s evaluation in addition to mason repair.
Spider-Web or Map Cracking
Fine cracks in many directions across the stone surface — typically a sign of severe weathering, prior bad surface coatings that are failing, or sandblasting damage. The stone is at the end of its serviceable surface life and needs resurfacing or replacement.
Wide Open Cracks With Visible Voids
Anything you can stick a pen or fingernail into is letting water deep into the wall. These need attention before the next winter.
Cracks at Stoop Treads and Risers
Almost universal on older brownstone stoops. The freeze-thaw cycle plus de-icing salt damages the front edge of each tread, and the original stone delaminates. Cosmetic until the cracks become trip hazards or pieces start coming loose.
Cracks Around Cornice Brackets and Ornament
Decorative brackets, modillions, and cornice elements crack at the connection points where they meet the wall. Water gets in, rust on embedded iron pins expands, and the stone splits.
The single most useful diagnostic question: are the cracks dry or wet after rain? Wet cracks are actively letting water in and getting worse fast. Dry cracks in protected locations are slower-moving.
Why Most Crack Repairs Fail
The most common bad repair is filling the crack with caulk or concrete patch and calling it done. Here’s why this doesn’t work:
- The crack is a symptom, not the cause. If the lintel underneath is still rusting, the patch cracks again next winter. If the bedding plane is still delaminating, the patch falls off. If the stone is moving structurally, the patch tears apart.
- Wrong material. Concrete patch or Portland-based repair material is too hard and too rigid for soft sandstone. It bonds poorly, doesn’t move with the stone, and creates a water trap behind it.
- Wrong color. Gray patches on brown stone are visible from a block away.
- Wrong texture. A smooth troweled patch on rough-faced brownstone reads as a patch forever.
What Proper Brownstone Crack Repair Looks Like
Diagnose the Underlying Cause
Before any repair work, figure out what’s causing the crack. Lintel rust? Foundation movement? Water source from above? Delamination from freeze-thaw? The repair scope follows from this.
Address the Cause
Replace rusted lintels. Repair failing flashing. Re-bed loose stones. Stabilize structural movement if a structural engineer identifies it.
Choose the Right Repair Method
For tight hairline cracks: stone consolidation. We inject silane-based consolidant that penetrates into the stone and re-binds the loose grains. Works on early-stage delamination. Doesn’t change appearance.
For wider cracks in non-structural stone: dutchman repair. Cut out the cracked section in a clean rectangular shape, and insert a new piece of stone or color-matched restoration compound. Properly done, the dutchman is nearly invisible.
For large failed areas: full resurfacing with restoration compound. The compound is custom-mixed to match the building’s specific brownstone color and applied in multiple layers with proper texture work.
For ornamental elements (cornice details, window surrounds, decorative carving): reproduction using cast restoration material taken from molds of intact original elements on the same building.
Match the Existing
This is where most contractors fail and where it shows. Color, texture, joint profile, sand size in the patch material — all of it has to match. We test sample patches and adjust before committing to the full repair.
Stoop Crack Repair
Stoops get specific treatment because they take heavy use:
- Treads with cracked front edges — typically resurfaced with restoration compound, edge built out to original profile, color-matched.
- Treads with full delamination — the top 1–2″ of the original stone has separated and needs to be removed before resurfacing.
- Risers — usually resurface in coordination with the treads.
- Cheek walls (the side walls of the stoop) — often have their own decorative caps and panels that need restoration.
- Newel posts and railings — the most visible elements; restored or replaced with matched material.
Stoop work is the most-attempted DIY job and the most-failed. Brownstone-look concrete from a bag never matches and doesn’t bond well. Properly color-matched restoration compound, applied by hand with the right texture, looks like the original.
When to Call a Structural Engineer Instead
Some crack patterns warrant an engineer’s evaluation before any mason work:
- Cracks that extend through multiple stories vertically
- Diagonal cracks that suggest foundation settlement
- Cracks that have widened measurably over months
- Cracks accompanied by interior wall cracking or door/window sticking
- Bulging or out-of-plumb sections of facade
We’ll tell you honestly if we think an engineer should look first. We don’t do the engineering work ourselves — that’s a separate professional discipline and a separate license.
Typical Repair Costs
- Single hairline crack consolidation: $300–$800
- Single window-head crack repair (with lintel replacement): $2,000–$5,000
- Stoop tread repair (per tread): $400–$1,200
- Full stoop restoration: $8,000–$25,000
- Single window surround restoration: $2,500–$6,000
- Decorative cornice element reproduction: $500–$3,500 per element
- Full facade resurfacing: $80,000–$250,000+
Frequently Asked Questions
Q: A crack opened up after the last freeze. Is the building in danger?
Probably not in immediate danger — sudden crack appearance after a freeze usually means water that was already in the wall expanded and finished a delamination that was already in progress. Worth getting it looked at before the next big rain, but it’s not typically structural.
Q: Should I caulk the cracks before winter to keep water out?
No. Caulking brownstone cracks traps moisture inside the stone, accelerates delamination, and makes proper repair more expensive later. If you need a temporary stopgap before proper repair, use a clear breathable water repellent (siloxane), not caulk.
Q: Can the cracks be repaired without scaffolding?
Cracks at the stoop and ground floor, yes. Cracks at upper stories on a row house generally need at least ladder access, often pipe scaffolding for anything above 15 feet. The cost of scaffolding makes it worth coordinating multiple repairs in one mobilization.
Q: Will the repair be visible after?
Done well, no — the repair area should be indistinguishable from the surrounding original stone at normal viewing distance. Up close you can see the boundary, but from the sidewalk it should disappear. If you can see the repair from across the street, it was done poorly.
Q: How long do brownstone repairs last?
Properly done dutchman repairs and resurfacing with quality restoration compound: 25–50+ years. The key is addressing the underlying cause (water source, rust, etc.) — otherwise the new patch fails on the same timeline as the original damage.
Q: Can you do crack repair in winter?
Limited scope, yes — small repairs in enclosed and heated areas can happen year-round. Larger work waits for above-freezing temperatures because restoration compound needs proper cure conditions. We schedule major brownstone work April through October.
Photos help. Send pictures of the cracks to innovation.construction@yahoo.com and we’ll give you an initial read. For anything serious, we’ll come look.
📞 718-666-7679